Category Archives: Qt

Test, 1, 2, 3, test, test

Everybody know these words. You say it when you have to check a microphone which were plugged into some sound system. It’s just test if the microphone is working well and the spoken words are reflected by the amplifier. It’s a simple test to check the functionality of the microphone or the whole sound system. Why should I write about sound systems? No, I don’t try to learn playing a guitar or any other instrument, I like to share some thoughts about software testing. After writing a post about Valgrind, I had the feeling that I should try to show some ways of testing software. In the following post I will analyze what can be tested, what is useful and which tools are available. I don’t aim to make a full overview of software testing itself, I just like to highlight some tools (or thoughts) which are useful and every developer should know of.

Why should I test my software

This is easy to answer. Humans write software and humans tend to make mistakes. Even if something is working perfect, a bug fix or new feature can break it. Testing software will not prevent you from bugs, but it can boost your user satisfaction a lot, by removing errors which are common and avoidable.

What can be tested

First of all, you should think about what should be tested at all. The following list tries to categorizes different tests from a technical perspective:

  1. Static tests
  2. Compile time tests
  3. Runtime test

Also we have to differ between automatic tests and manual tests done by an operator. In the following I will prioritize the automatic tests, simply because once they are setup, they are easier to handle. Manuel tests means, setting up a test plan, making someone responsible for checking the test plan and forcing the test to be done before a release. On the other side automatic tests could be done by a machine at day and night with every software level your application is currently in.

Static tests

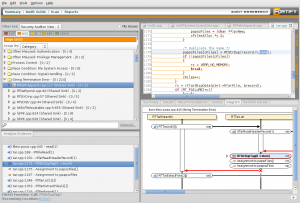
Static tests analyze the code base and try to predict error paths. There are several applications on the market, but most of them are not free. First you need a product which speaks your language. If you develop in C, C++, Java, C# or whatever makes a huge difference here. There are many static analyzer out there which can analyze C, but not many can successfully parse any of the widely used higher programming languages. One of them, which can analyze C++, is Fortify. Fortify uses rules to find different errors a developer can do. There are of course default rules, but a developer can define rules himself. This product is specialized in detecting errors which may end in security holes. One such error in terms of security considerations is file input handling. When one is reading a string directly out of a file, some assumptions are done. Strings in the C/C++ world are zero terminated. All string handling/manipulation function, which are available e.g. from the glibc, are working over the single characters as long as they didn’t find the termination byte. Now, if a developer is reading a string out of a file and doesn’t check if the terminating zero is there, he open a security hole. If an attacker is using this knowledge he is able to provoke a buffer overflow. Fortify can detect such blindly faith to input data. Of course it can detect much more. On the down side, as most software projects are really complex, static code analyzer tend to produce many false/positive. Working through this false/positive and defining filters for the own software project needs much time. On the other side these tools help in finding error paths, which even runtime tests doesn’t show, cause they are so unusual. But exactly these errors are used by attackers to abuse your software for bad things.

Compile time tests

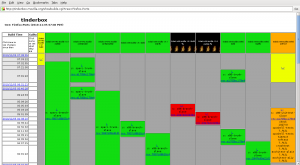
Compile tests make sure your application compiles on different architectures, bit depth, or with other resources like external dependencies (e.g. depending third-party libraries). They are important when you develop for and/or if your team is using different platforms. They make sure a software is at least compiling on every important system. This doesn’t mean the current status works well, it just makes sure every developer involved in the progress of the product is able to build an actual version, even if he is working on a different part of the software itself. Such a situation happens often in open source products, like Mozilla, which invented tinderbox for making these tests. It allows you to set up different build environments for your software and watch the result of every check-in you made in terms of compatibility to this environment. The following shows a screenshot of the Firefox-Ports tinderbox with one broken build box. As everybody know, red is bad:

Red means a burning tree. It shows you that your last check-in doesn’t compile on a specific system. The cool thing is that you can look at the log and spot the error with ease. You know why it doesn’t compile and can fix it. This will prevent you from being blamed by other team members because they can’t work with the current trunk.

Runtime tests

Runtime tests are of course the biggest part of testing. They try to make sure the application does the job it was written for. This also means these tests are the hardest one. It may help to try to separate them as well. I use the following separation:

  1. Unit tests
  2. Dynamic analyzer
  3. GUI tests

Unit tests

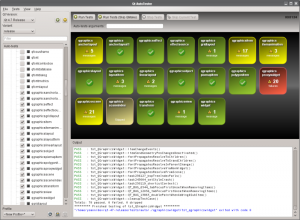
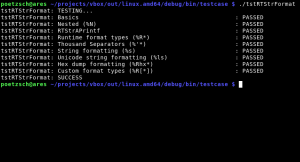
Unit tests check that the specialized functionality a unit provide is working correctly. A well-known example is string handling. String handling is necessary in almost all software projects out there. May it printing the help section of a command line tool or the information presentation in an GUI application. A unit test tries to test anything a user of this unit may do with it. This could be adding a string to another, replacing parts of a string, converting a string to other formats (like to another encoding or to an integer) or much more complex operations like searching within a string with a regular expression. All these operations could be relatively easy tested with unit tests. There is no general usable software out there which could be used for unit testing, but most software frameworks offer some help to write unit tests. Qt has a unit test framework and VirtualBox has a integrated system, as well. Here is a screenshot from a just announced graphical tool by Nokia, which makes spotting errors in Qt unit tests much more easier. The second screenshot shows the output of a VirtualBox unit test.

Please also note that unit testing not just means testing functionality. It could also mean testing performance regression. If some function needed an amount of time in an existing version, it should be at least equal or faster in means of execution time in a new version. Unit tests are evolutionary like the software itself. It is illusionary to believe a unit test is finished sometime. The test will/should grow as long as users will report errors. Often a unit test is called by the bugtracker id, which showed some specific problem the first time.

Dynamic analyzer

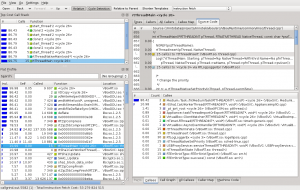
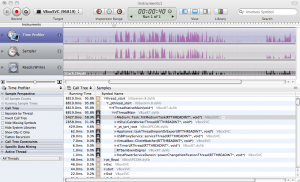
This field of testing is a little bit different from the other one, cause the developer needs to interact here. Although it would be possible to automate some of these tests, they are more designed to be done by the developer from time to time (usually after a feature is completed) to check for some basic errors. The most common dynamic analyzer in the open source world is the Valgrind instrumentation framework. It has a tool for checking memory management errors, like I showed in this post. As already written there, memory leak errors can happen to everyone, so having a tool for finding and eliminating them, is very useful. On the other side there is a tool called Callgrind, which profiles a given software in detail. After profiling some software, a developer is able to see execution times relatively to each other. This makes it possible to find the places an algorithm spend the most time. With this information a developer has the chance to find bottlenecks, which maybe could be eliminated. Beside that, is the knowledge of the call graph sometimes from great information, especially if you develop graphical applications, like in Qt. Having events, slots or asynchrony window systems, like in X11, make it sometimes hard to predict how the code will flow. It may also be helpful in deciding if some subroutine is a candidate for parallel execution. The following screenshot shows the result of analyzing some parts of VirtualBox. To visualize the output of Callgrind (and to interactively work with this data), KCachegrind is the number one tool. The second screenshot shows some similar profiling with Instruments from Xcode.

GUI tests

GUI’s have the advantage to do several tasks in an independent order and users tend to do tasks in a way a developer don’t expect. Developer tends to do tasks in the way they have programmed it. On the other side GUI testing tools do only things they are programmed for. To be honest, we don’t do any automatic GUI testing in VirtualBox. It’s such a wide field and doing it right is hard. Anyway, there are products out there which can be helpful. Qt itself have possibilities for GUI testing build in. Another product is from froglogic. Squish is specialized in GUI testing, especially for Qt applications. But of course there are other tools as well. Just have a look at your preferred build environment.

Conclusion

Testing produces work. It is also something developers don’t like. On the other side it helps to prevent further work by bypassing errors which are preventable. Everybody should ask himself how much time he will sacrifice in setting up test machines or unit tests to make a product much more stable. Errors in freshly released products which don’t happen in an older release are always bad marketing. If there is a chance to prevent them by just adding some lines of code, everyone should use this chance. This post doesn’t show all available tools for testing. For example, the big players like Apple and Microsoft have also testing and analyzing software build into there IDE’s. I just want to give a brief overview what is possible, so that everybody could check the own environment for possibilities of doing testing.

As a last word which touches my personal work environment: Please be assured that we are trying hard to make VirtualBox as stable and save as much as possible ;).
Creating file shortcuts on three different operation systems

As you may know, developing for multiple platforms is one of my strengths. Strictly speaking, it’s a basic requirement if you are involved in such a product like VirtualBox, which runs on every major (and several minor) platform available today. Beside the GUI, which uses Qt and therewith is portable without any additional cost (which isn’t fully true if you want real native look and feel on every platform, especially on Mac OS X), all the rest of VirtualBox is written in a portable way. This is done by using only C/C++ and Assembler when necessary. Everything which needs a different approach, because of the design of the OS (and the API’s which are available there), is implemented in a platform dependent way. In the history of VirtualBox, several modules are created and grown by the time, which makes it really easy to deal with this differences. For stuff like file handling, paths, strings, semaphores or any other basic functionality, you can just use the modules which are available. On the other side it might be necessary, for a new feature we implement, to write it from the ground. In the following post I will show how to create a file shortcut for the three major operation systems available today.

Why do you want to use file shortcuts

On the classical UNIX systems you have hard and soft links. These are implemented by the filesystem and make it possible to link to another file or folder without any trouble. Most of the time soft links are used, but it really depends on the use case. Unfortunately these kind of links are not available on Windows (yes, I know there are also hard links and junctions on NTFS, but they are not common and difficult to handle), these links doesn’t allow any additional attributes. For example one like to add a different icon to the link or provide more information through a comment field. Beside on Mac OS X, shortcuts can also be work as an application launcher, where the link contain the information what application should be started and how. In contrast to filesystem links which are handled by the operation system, these shortcuts are handled by the window system (or shell) running on the host (which doesn’t mean there is no filesystem support for it). On Windows this is the Explorer, on Mac OS X the Finder and on Linux a freedesktop.org conforming file manager.

Creating a Desktop file on Linux

Desktop files on Linux (or any other UNIX system which conforms to freedesktop.org) is easy. It’s a simple text file which implement the Desktop Entry Specification. In version 1.0 there are 18 possible entries, where not all of them are mandatory. In the following example I use Qt to write these files, but it should be no problem to use any other toolkit or plain C.

bool createShortcut(const QString &strSrcFile,
                    const QString &strDstPath,
                    const QString &strName)
{
 QFile link(strDstPath + QDir::separator() + strName + ".desktop");
 if (link.open(QFile::WriteOnly | QFile::Truncate))
 {
  QTextStream out(&link);
  out.setCodec("UTF-8");
  out << "[Desktop Entry]" << endl
      << "Encoding=UTF-8" << endl
      << "Version=1.0" << endl
      << "Type=Link" << endl
      << "Name=" << strName << endl
      << "URL=" << strSrcFile << endl
      << "Icon=icon-name" << endl;
  return true;
 }
 return false;
}

Replace icon-name by a registered icon on the system and you are done.

Creating a Shell link on Windows

Windows provides an interface for IShellLink since Windows XP. The following example shows how to use it:

bool createShortcut(LPCSTR lpszSrcFile,
                    LPCSTR lpszDstPath,
                    LPCSTR lpszName)
{
 IShellLink *pShl = NULL;
 IPersistFile *pPPF = NULL;
 HRESULT rc = CoCreateInstance(CLSID_ShellLink,
                               NULL,
                               CLSCTX_INPROC_SERVER,
                               IID_IShellLink,
                               (void**)(&pShl));
 if (FAILED(rc))
  return false;
 do
 {
  rc = pShl->SetPath(lpszSrcFile);
  if (FAILED(rc))
   break;
  rc = pShl->QueryInterface(IID_IPersistFile, (void**)&pPPF);
  if (FAILED(rc))
   break;
  WORD wsz[MAX_PATH];
  TCHAR path[MAX_PATH] = { 0 };
  lstrcat(path, lpszDstPath);
  lstrcat(path, "\");
  lstrcat(path, lpszName);
  lstrcat(path, ".lnk");
  MultiByteToWideChar(CP_ACP, 0, buf, -1, wsz, MAX_PATH);
  rc = pPPF->Save(wsz, TRUE);
 } while(0);
 if (pPPF)
  pPPF->Release();
 if (pShl)
  pShl->Release();
 return SUCCEEDED(rc);
}

As you may noticed this uses COM. Many API’s on Windows using the COM interface to communicate between processes. If you don’t use COM in your application you have to initialize it first. This is achieved by adding the following call to the front of the function:

 if (FAILED(CoInitialize(NULL))
  return false;

Depending on your application it might be worth to unitialize COM after usage by appending the following to the function:

 CoUninitialize();

The function itself isn’t any magic. It gets a COM interface to the IShellLink interface and then work with it, by setting the source path and adding a target path by using the IPersistFile interface. As I wrote before you could do much more. Providing a path to a specific application or adding your own parameters is no problem. Have a look at the documentation.

Creating an Alias file on Mac OS X

Shortcut files on Mac OS X are a little bit different. At first, they aren’t one. There are the classical filesystem links and Alias files. Alias files are links which targeting a specific file, but they haven’t all the possibilities of shortcuts like on Windows or Linux. As the name suggest they are really only an alias for another file or directory. So specifying an application to start or things like that aren’t possible. Anyway they allow changing the icon and they are more persistent than on Window or Linux cause they are working with several attributes of the target file. Even if you rename or move the target, an Alias file will resolve the target correctly (if it is possible). On the other side, being such special means also being hard to create. In principle there are two possibilities. The first one is, creating a file which is no file at all, but has several resources forks attached. Therefor you need to know exactly how Alias files are built of and make sure with every release of Mac OS X you are following the development. There is a free project which does exactly that: NDAlias. If you are like me and a little bit more lazy, you ask someone who should know how to create Alias files. This is Finder. Although writing the files itself isn’t easy, asking the Finder to do the job is not really easier, cause the information about doing exactly that are really rare. The following code shows how to achieve it:

bool createShortcut(NSString *pstrSrcFile,
                    NSString *pstrDstPath,
                    NSString *pstrName)
{
 /* First of all we need to figure out which process Id the Finder
  * currently has. */
 NSWorkspace *pWS = [NSWorkspace sharedWorkspace];
 NSArray *pApps = [pWS launchedApplications];
 bool fFFound = false;
 ProcessSerialNumber psn;
 for (NSDictionary *pDict in pApps)
 {
  if ([[pDict valueForKey:@"NSApplicationBundleIdentifier"]
         isEqualToString:@"com.apple.finder"])
  {
   psn.highLongOfPSN = [[pDict
                          valueForKey:@"NSApplicationProcessSerialNumberHigh"] intValue];
   psn.lowLongOfPSN  = [[pDict
                          valueForKey:@"NSApplicationProcessSerialNumberLow"] intValue];
   fFFound = true;
   break;
  }
 }
 if (!fFFound)
  return false;
 /* Now the event fun begins. */
 OSErr err = noErr;
 AliasHandle hSrcAlias = 0;
 AliasHandle hDstAlias = 0;
 do
 {
  /* Create a descriptor which contains the target psn. */
  NSAppleEventDescriptor *finderPSNDesc = [NSAppleEventDescriptor
                                            descriptorWithDescriptorType:typeProcessSerialNumber
                                            bytes:&psn
                                            length:sizeof(psn)];
  if (!finderPSNDesc)
   break;
  /* Create the Apple event descriptor which points to the Finder
   * target already. */
  NSAppleEventDescriptor *finderEventDesc = [NSAppleEventDescriptor
                                              appleEventWithEventClass:kAECoreSuite
                                              eventID:kAECreateElement
                                              argetDescriptor:finderPSNDesc
                                              returnID:kAutoGenerateReturnID
                                              transactionID:kAnyTransactionID];
  if (!finderEventDesc)
   break;
  /* Create and add an event type descriptor: Alias */
  NSAppleEventDescriptor *osTypeDesc = [NSAppleEventDescriptor descriptorWithTypeCode:typeAlias];
  if (!osTypeDesc)
   break;
  [finderEventDesc setParamDescriptor:osTypeDesc forKeyword:keyAEObjectClass];
  /* Now create the source Alias, which will be attached to the event. */
  err = FSNewAliasFromPath(nil, [pstrSrcFile fileSystemRepresentation], 0, &hSrcAlias, 0);
  if (err != noErr)
   break;
  char handleState;
  handleState = HGetState((Handle)hSrcAlias);
  HLock((Handle)hSrcAlias);
  NSAppleEventDescriptor *srcAliasDesc = [NSAppleEventDescriptor
                                           descriptorWithDescriptorType:typeAlias
                                           bytes:*hSrcAlias
                                           length:GetAliasSize(hSrcAlias)];
  if (!srcAliasDesc)
   break;
  [finderEventDesc setParamDescriptor:srcAliasDesc
    forKeyword:keyASPrepositionTo];
  HSetState((Handle)hSrcAlias, handleState);
  /* Next create the target Alias and attach it to the event. */
  err = FSNewAliasFromPath(nil, [pstrDstPath fileSystemRepresentation], 0, &hDstAlias, 0);
  if (err != noErr)
   break;
  handleState = HGetState((Handle)hDstAlias);
  HLock((Handle)hDstAlias);
  NSAppleEventDescriptor *dstAliasDesc = [NSAppleEventDescriptor
                                           descriptorWithDescriptorType:t ypeAlias
                                           bytes:*hDstAlias
                                           length:GetAliasSize(hDstAlias)];
  if (!dstAliasDesc)
   break;
  [finderEventDesc setParamDescriptor:dstAliasDesc
    forKeyword:keyAEInsertHere];
  HSetState((Handle)hDstAlias, handleState);
  /* Finally a property descriptor containing the target
   * Alias name. */
  NSAppleEventDescriptor *finderPropDesc = [NSAppleEventDescriptor recordDescriptor];
  if (!finderPropDesc)
   break;
  [finderPropDesc setDescriptor:[NSAppleEventDescriptor descriptorWithString:pstrName]
    forKeyword:keyAEName];
  [finderEventDesc setParamDescriptor:finderPropDesc forKeyword:keyAEPropData];
  /* Now send the event to the Finder. */
  err = AESend([finderEventDesc aeDesc],
               NULL,
               kAENoReply,
               kAENormalPriority,
               kNoTimeOut,
               0,
               nil);
 } while(0);
 /* Cleanup */
 if (hSrcAlias)
  DisposeHandle((Handle)hSrcAlias);
 if (hDstAlias)
  DisposeHandle((Handle)hDstAlias);
 return err == noErr ? true : false;
}

Although the code above looks a little bit scary, it does not much. It fetch the process serial number of the current Finder process, creates an Application event for creating an Alias file and send this event to the Finder.

Conclusion

Beside showing how to create file shortcuts on different platforms, this article also shows which work is necessary to create platform independent code. It’s a simple example. But it also makes clear that one simple solution for platform one, not necessarily mean it’s such simple on platform two.

Making this easy accessible to any developer is the next step. I will leave this exercise to the reader, but have a look at the platform code of the VirtualBox GUI and the corresponding Makefile.

Using suppression files with Valgrind

Valgrind is one of the great tools in the long list of freely available applications for development. Beside several profiling tools it also contains a memory checker. Leaking memory is one of the more common errors a programmer could step into. Basically it means to forget freeing memory (or in a more general sense: any resource) a program has acquired. If you are a perfect developer, this will never happen to you. If you are a good developer it may happen and that’s where Valgrind will save you some trouble. As most of the developers out there are more or less good developers, their programs produce memory leaks, too ;). The right solution for this, is of course to write a bug report. But there are times where this isn’t possible or you are in hurry and don’t want to see all the errors of a third-party library you link against.

In the following post, I will show how to suppress such unwanted error messages to make it much more easier to analyze the output of Valgrind for your own application.

Installing Valgrind

On Mac OS X you can use MacPorts to install Valgrind. You have to use valgrind-devel if you are on Snow Leopard, because Snow Leopard is supported in the current development version only. It’s as simply as typing sudo port install valgrind-devel.

On Gentoo it can become a bit harder. The current stable version is 3.5 (like in MacPorts). If you try this version (at least on an unstable Gentoo like mine) with valgrind ls, you will get the following error:

valgrind:  Fatal error at startup: a function redirection
valgrind:  which is mandatory for this platform-tool combination
valgrind:  cannot be set up.  Details of the redirection are:
valgrind:
valgrind:  A must-be-redirected function
valgrind:  whose name matches the pattern:      strlen
valgrind:  in an object with soname matching:   ld-linux-x86-64.so.2
valgrind:  was not found whilst processing
valgrind:  symbols from the object with soname: ld-linux-x86-64.so.2
valgrind:
valgrind:  Possible fixes: (1, short term): install glibc's debuginfo
valgrind:  package on this machine.  (2, longer term): ask the packagers
valgrind:  for your Linux distribution to please in future ship a non-
valgrind:  stripped ld.so (or whatever the dynamic linker .so is called)
valgrind:  that exports the above-named function using the standard
valgrind:  calling conventions for this platform.
valgrind:
valgrind:  Cannot continue -- exiting now.  Sorry.

The reason is a striped glibc. To work properly, Valgrind needs to overwrite some of the system functions the glibc provide. It does this by getting the symbols by name out of this library. This is of course not possible if all the symbol names are removed. You can prove this by executing nm /lib/ld-linux-x86-64.so.2. Gentoo provides a FEATURE=splitdebug, which adds debug libraries to the installation. Unfortunately setting this feature in /etc/make.conf, means setting it global. Gentoo is known as being configurable as no other distribution out there and of course we can set a feature for one program only. To do so, create a file called glibc in /etc/portage/env/sys-libs/ and add the following content to it.

FEATURES="splitdebug"

After a rebuild of glibc by executing emerge --oneshot glibc, we have a working Valgrind.

As all programs, Valgrind isn’t perfect. Version 3.5 shows many false/positive hits on my system, but fortunately the development goes on. Currently there is no newer version available in the Gentoo tree. Anyway it is not necessary to build one yourself, to get a more recent version. Using layman and the overlay tree of Flameeyes will let you integrate the development version of Valgrind seamlessly into your system. For a general How-to of layman check out this Users’ guide. In short, something like the following should be sufficient:

layman -a flameeyes-overlay
layman -s flameeyes-overlay
echo "=dev-util/valgrind-9999 **" >> /etc/portage/package.keywords
emerge valgrind

Installing the development version of Valgrind is optional of course.

Know your tools

One usage of Valgrind could be look like this:

valgrind --leak-check=full --leak-resolution=high ./VirtualBox

Beside other errors it also shows this error message on my system:

==27174==    at 0x4C26C09: memalign (in /usr/lib64/valgrind/vgpreload_memcheck-amd64-linux.so)
==27174==    by 0x4C26CB9: posix_memalign (in /usr/lib64/valgrind/vgpreload_memcheck-amd64-linux.so)
==27174==    by 0xBA8967F: ??? (in /usr/lib64/libglib-2.0.so.0.2400.2)
==27174==    by 0xBA89E9D: g_slice_alloc (in /usr/lib64/libglib-2.0.so.0.2400.2)
==27174==    by 0xBA89F86: g_slice_alloc0 (in /usr/lib64/libglib-2.0.so.0.2400.2)
==27174==    by 0xC204847: g_type_create_instance (in /usr/lib64/libgobject-2.0.so.0.2400.2)
==27174==    by 0xC1EB8A5: ??? (in /usr/lib64/libgobject-2.0.so.0.2400.2)
==27174==    by 0xC1ECE5D: g_object_newv (in /usr/lib64/libgobject-2.0.so.0.2400.2)
==27174==    by 0xC1ED494: g_object_new (in /usr/lib64/libgobject-2.0.so.0.2400.2)
==27174==    by 0x72A495F: ??? (in /usr/lib64/qt4/libQtGui.so.4.6.3)
==27174==    by 0x72A0D4F: ??? (in /usr/lib64/qt4/libQtGui.so.4.6.3)
==27174==    by 0x7289264: QGtkStyle::QGtkStyle() (in /usr/lib64/qt4/libQtGui.so.4.6.3)
==27174==    by 0x7215DB6: QStyleFactory::create(QString const&) (in /usr/lib64/qt4/libQtGui.so.4.6.3)
==27174==    by 0x6F5B7FC: QApplication::style() (in /usr/lib64/qt4/libQtGui.so.4.6.3)
==27174==    by 0x6F61DFF: QApplicationPrivate::initialize() (in /usr/lib64/qt4/libQtGui.so.4.6.3)
==27174==    by 0x6F61E88: QApplicationPrivate::construct(_XDisplay*, unsigned long, unsigned long) (in /usr/lib64/qt4/libQtGui.so.4.6.3)
==27174==    by 0x6F61FF3: QApplication::QApplication(_XDisplay*, int&, char**, unsigned long, unsigned long, int) (in /usr/lib64/qt4/libQtGui.so.4.6.3)
==27174==    by 0x44BC38: TrustedMain (main.cpp:371)
==27174==    by 0x44C649: main (main.cpp:651)

If you analyze the backtrace, you see that something in libQtGui is leaking memory. I don’t want to blame someone for it or make a statement if this is right or wrong, I just want to get rid of it, to be able to easily spot errors VirtualBox itself produce. To do so, add --gen-suppressions=all to the Valgrind call. This will produce something similar like this:

{
 Memcheck:Leak
 fun:memalign
 fun:posix_memalign
 obj:/usr/lib64/libglib-2.0.so.0.2400.2
 fun:g_slice_alloc
 fun:g_slice_alloc0
 fun:g_type_create_instance
 obj:/usr/lib64/libgobject-2.0.so.0.2400.2
 fun:g_object_newv
 fun:g_object_new
 obj:/usr/lib64/qt4/libQtGui.so.4.6.3
 obj:/usr/lib64/qt4/libQtGui.so.4.6.3
 fun:_ZN9QGtkStyleC1Ev
 fun:_ZN13QStyleFactory6createERK7QString
 fun:_ZN12QApplication5styleEv
 fun:_ZN19QApplicationPrivate10initializeEv
 fun:_ZN19QApplicationPrivate9constructEP9_XDisplaymm
 fun:_ZN12QApplicationC1EP9_XDisplayRiPPcmmi
 fun:TrustedMain
 fun:main
}

To let Valgrind ignore this error in the future, copy the text into a file vbox.supp and start Valgrind with --suppressions=vbox.supp. Viola, this specific error isn’t shown anymore. The format used there is easy to understand and you can of course tweak this much more. E.g. you could replace some of the fun: entries by “...“. This is a placeholder for one or more functions calls with any name. Beside making suppression rules more general you can of course add as much as you like. Adding a name at the top make it easy to identify the different rules. For all the possibilities have a look at the documentation. Just for the curious, Valgrind is using such a file itself. Have a look at /usr/lib/valgrind/default.supp. You may also have noted that the function names in the normal error message differ from the one in the suppression list. The former is in the demangled form and the later in the saved form. You could force Valgrind to print mangled function names by adding the --demangle=no parameter to the call. This becomes handy if you manually create suppression lists.

Conclusion

By using suppression rules for the own application, unimportant errors could be eliminated in the output of Valgrind. With this is in mind there is no excuse anymore for memory leaks in the self developed applications. Beside memory leaks, Valgrind also finds places where uninitialized variables are in use or where memory is used which isn’t allocated by the application. Also these tests could be filtered out by suppression rules.

Integrating native Cocoa controls into Qt

Making applications looking and feeling as native as possible on every supported platform is one of my main responsibilities within the VirtualBox development. Most of the work therefor is done by the Qt framework which we are using for our GUI. Qt does a nice job for Windows and most of the currently popular X11 window toolkits used under Unix and Linux. They are behaving and looking similar in many ways which make it easy to develop for both architectures. Unfortunately this doesn’t count in any case for Mac OS X, which often uses very different approaches or uses very specialized controls to reach a specific aim. One of this controls is the Mac OS X help button who every Mac user is familiar with. If an Mac OS X application doesn’t use this help button, it breaks the design rules and the application, lets say, smells a little bit “under designed”. The following little example shows how to integrate a NSButton seamlessly into your Qt application.

Qt make it easy

Nokia added the QMacCocoaViewContainer class with Qt 4.5. This class make it easy to integrate any NSView or deviate of the NSView class into the QWidget hierarchy of an application. The best integration is archived if one deviate from QMacCocoaViewContainer. To use Cocoa code and C++ classes at once the Objective-C++ compiler is necessary. The gcc uses the Objective-C++ compiler automatically if the source file ends with mm. We start with the C++ interface which looks like the following:

ADD_COCOA_NATIVE_REF(NSButton);
class CocoaHelpButton: public QMacCocoaViewContainer
{
    Q_OBJECT
public:
    CocoaHelpButton(QWidget *pParent = 0);
    QSize sizeHint() const;
    void onClicked();
signals:
    void clicked();
private:
    NativeNSButtonRef m_pButton;
};

For any Qt programmer this class definition is easy to understand. The only unusual is the ADD_COCOA_NATIVE_REF macro call and the NativeNSButtonRef type itself. One could say NativeNSButtonRef should be NSButton* and you are done, but it’s not that easy. The reason for this is that the include file will be included first in the Objective-C++ source code file, where the NSButton* definition wouldn’t be a problem, but secondly in every C++ source file which will use the CocoaHelpButton, where on the other side any Cocoa code is forbidden. The ADD_COCOA_NATIVE_REF macro avoid this problem by expanding NativeNSButtonRef to NSButton* if Objective-C++ code is compiled and to void* if C++ code is compiled. The macro itself looks like this:

#ifdef __OBJC__
# define ADD_COCOA_NATIVE_REF(CocoaClass) 
    @class CocoaClass; 
    typedef CocoaClass *Native##CocoaClass##Ref
#else /* __OBJC__ */
# define ADD_COCOA_NATIVE_REF(CocoaClass) typedef void *Native##CocoaClass##Ref
#endif /* __OBJC__ */

The advantage of using such a macro is that one can use all methods of the NSButton in the Cocoa part of the source code without any casting.

A little bit of Cocoa

The initialization of the CocoaHelpButton class is straight forward as seen in the next code part:

CocoaHelpButton::CocoaHelpButton(QWidget *pParent /* = 0 */)
  :QMacCocoaViewContainer(0, pParent)
{
    m_pButton = [[NSButton alloc] init];
    [m_pButton setTitle: @""];
    [m_pButton setBezelStyle: NSHelpButtonBezelStyle];
    [m_pButton setBordered: YES];
    [m_pButton setAlignment: NSCenterTextAlignment];
    [m_pButton sizeToFit];
    NSRect frame = [m_pButton frame];
    frame.size.width += 12; /* Margin */
    [m_pButton setFrame:frame];
    /* We need a target for the click selector */
    NSButtonTarget *bt = [[NSButtonTarget alloc] initWithObject: this];
    [m_pButton setTarget: bt];
    [m_pButton setAction: @selector(clicked:)];
    /* Make sure all is properly resized */
    resize(frame.size.width, frame.size.height);
    setSizePolicy(QSizePolicy::Fixed, QSizePolicy::Fixed);
}

QSize CocoaHelpButton::sizeHint() const
{
    NSRect frame = [m_pButton frame];
    return QSize(frame.size.width, frame.size.height);
}

void CocoaHelpButton::onClicked()
{
    emit clicked(false);
}

This set up the NSButton object and make sure that everything has the right size. As shown there, to make a standard button a help button the bezel style has been set to NSHelpButtonBezelStyle. To get the click notification the wrapper class NSButtonTarget is necessary.  As highlighted in the code above the target action is set to the selector “clicked”.  The NSButtonTarget class looks as follow:

@interface NSButtonTarget: NSObject
{
    CocoaHelpButton *m_pTarget;
}
-(id)initWithObject:(CocoaHelpButton*)object;
-(IBAction)clicked:(id)sender;
@end
@implementation NSButtonTarget
-(id)initWithObject:(CocoaHelpButton*)object
{
    self = [super init];
    m_pTarget = object;
    return self;
}
-(IBAction)clicked:(id)sender;
{
    m_pTarget->onClicked();
}
@end

If you put all this together and add the CocoaHelpButton class to your project you will get some output like this:

More integration could be reached by adding wrapper methods for e.g. setting the tooltip, but this is left out as an exercise for the reader.

Conclusion

For more complex controls like a NSSearchField more interaction with Cocoa will be necessary. On the other hand this little excursion to the Cocoa world should make it easy for everyone to add shiny new Mac OS X controls to the own Qt application.